


Question:
Is it possible to append a different signature depending on whether you're an sending an email internally or externally to your organisation?
Solution:
Yes, it is possible, and simple to apply!
In order to create a different internal and external signature most effectively, you first need to understand the structure of a signature.
Your signature is made up of two parts: the Main Signature and Signature Blocks.
If you have information that you would like everyone, in all circumstances, to see on your emails, this should be part of your Main Signature.
If you would like an element or piece of information to only appear to some people, e.g.a disclaimer or ad banner for those external to your company, this should be created as a Signature Block.
Placing your information in a Signature Block allows you to retain full control of that element - you can apply separate rules to it and customise who sees it.
Your overall signature can be made up of your Main Signature and one or more Signature Blocks triggered by the rules you apply.
To create a Main Signature
We suggest that you only include elements which are relevant for all your users since this will be seen by all users who receive your emails.
1. Log into Crossware Email Signature and click "Signature Designer".
2. In the left sidebar menu, select "Signatures" > "Create New"
3. Give your signature a Name and a useful Description.
4. Design your Main Signature by adding fields, images and text in the signature editor.
5. Click Save and close.
2. In the left sidebar menu, select "Signatures" > "Create New"
3. Give your signature a Name and a useful Description.
4. Design your Main Signature by adding fields, images and text in the signature editor.
5. Click Save and close.
To create a Signature block
For example, an externally applied email disclaimer.We suggest that you include elements / additional information that is not relevant for all email recipients. You can create multiple blocks.
1. In the left sidebar menu, select "Signatures" > "Signature Blocks"
2. Give your Signature Block a Name and a useful Description.
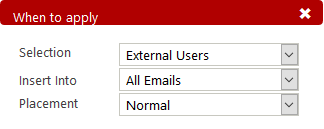
3. Click "Change next to Applies to:" and select "External Users" from the drop down selections then click the red "X".
2. Give your Signature Block a Name and a useful Description.
3. Click "Change next to Applies to:" and select "External Users" from the drop down selections then click the red "X".
The settings in the example below will apply the disclaimer when you send en email to a recipient outside of your company. The placement will be immediately after the last word of your text.
4. Create and style your disclaimer in the Signature Block editor.
5. Save your Signature Block.
5. Save your Signature Block.
Putting your signature together
You can now attach your completed Signature Block to your Main Signature. The Main Signature will apply to all emails, and if you are sending externally, then the disclaimer Signature Block will be appended too.1. Open your Signature (created in Step 1) in "Edit" mode.
2. Select "Signature Blocks" in the horizontal menu below the title.
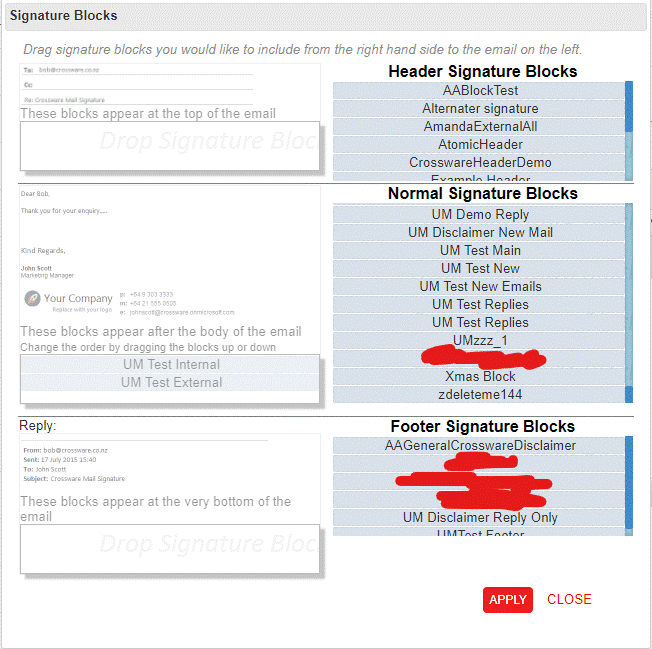
3. In the dialogue box that opens, you should be able to see your disclaimer Signature Block in the Normal Signature Blocks list.
2. Select "Signature Blocks" in the horizontal menu below the title.
3. In the dialogue box that opens, you should be able to see your disclaimer Signature Block in the Normal Signature Blocks list.
Click the "+" beside the Signature Block, or drag and drop it to your chosen place on the left hand side of the dialogue box. If you have multiple Signature Blocks, you can easily reorder these by dragging and dropping.
4. Click "Apply".
5. "Save" your signature.