


Mail Signature overview
When you open up Signature Designer you will be at the main screen.
Let's explore the following sections and descriptions.
1. Signature Designer Menu
The Signature menu is always locked on the left hand side allowing you to view this menu while creating signatures.
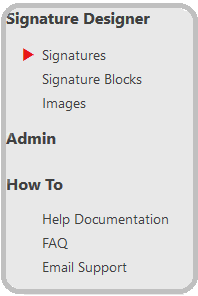
2. Content display window
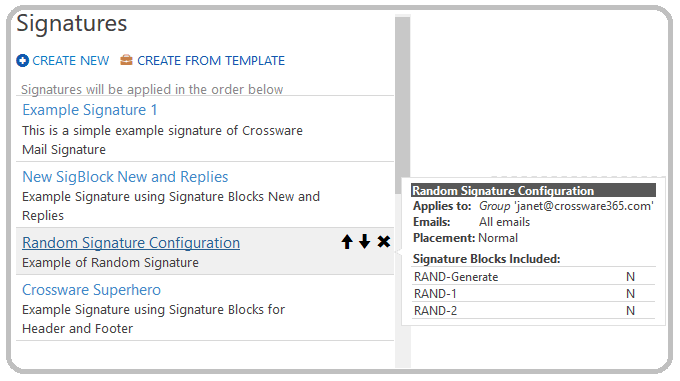
Signatures
You can create new signatures here using 'Create New" and 'Create from Template' apply them to a group or based on certain criteria using rules.
When your signature is created the signature will appear here in a list. You can move the order of the signatures and view the summary of the signature by hovering your mouse over the signature configuration.
Signature Blocks
Signature blocks are like building blocks... they are parts of a signature that can be put together to form a whole signature.
They can be re-used in multiple signature designs allowing you the freedom to add and remove signature blocks as required.
You can create a signature block using 'Create New'.
When you save your signature block, this signature will be appear in this list.
Images
This is the image library where you can store images for use within your signature.
The image look up allows you to insert custom images such as your company logo, ad banners, social media icons etc. directly into the body of an email.
The images are added in-line and not as attachments which makes them look professional.
You can create a folder using 'New Folder' and add a image to a folder using 'Add Image'
Admin
The Admin section is where you can fine tune your signature experience by giving you the option to customise fields, rules and metadata settings.
Check the health status of Signature Designer using information from the service log, cache update log and application log.
How To
The links in the 'How To" section will take you to the Microsoft 365 Wiki UI 2.0 for Help Documentation, FAQ for frequently asked questions and open up an email client where you can send our Support Team an email for support.
3. Working window
This window displays the configuration documents for creating new and editing existing configuration documents.
Building your Signature overview
Create your Signature
There are a number of ways to build your signature it all depends on your requirements. To get your familiarised with how to use Crossware Email Signature the following guide will step you through creating a Signature.
1. Create a Signature
This could be a signature that contains all the information you require OR a signature that includes signature blocks.
From the Signature Designer > go to Signatures menu and create a Signature using CREATE NEW or CREATE FROM TEMPLATE
2. Create a Signature Block Signature Blocks
Signature blocks are great if you want to see or hide parts of a signature depending on the applies to criteria. e.g. you only want to include a banner and disclaimer if you are sending to an external person (someone outside of your company), if you are sending internally you don't want to see this information. This type of scenario can be handled using signature blocks.
Putting your Signature together
If all that you require is one signature for your company (Main Signature) then you have successfully created your signature. If you had created signature blocks then you will need to link these blocks back to your signature design.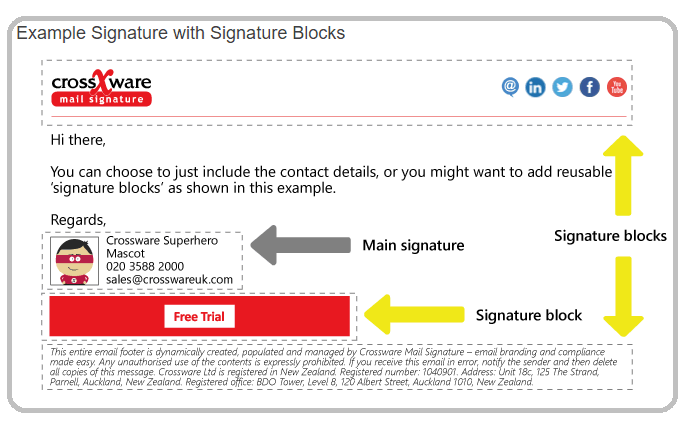
1. Find your signature design by going to Signatures > from the list select your signature.
2. Open your signature > put into edit mode by clicking on EDIT
3. To include the signature blocks you have created select Signature Blocks and add the signature blocks you have created > select SAVE
4. You will be returned to the Signature window > selecting Signature Preview will show the Signature including the Signature blocks you have added.
Select CLOSE to return to the Signature view.
5. To test send a test using SEND TEST EMAIL